Sushi is always a delicious and decorative addition to your Japanese-themed meal. Still, the real trick is from the art of preparation. Suppose you are wondering how to prepare fish for sushi. In that case, this complete guide will tell you everything you need to know beforehand, even if you have never made sushi before.
The fish intended for sushi preparation usually must be frozen in the freezer for 3-7 days, unless it was previously flash-frozen by the fishing company. Then after the fish is thawed, it is cut into a fillet. The fillet is then cured and cut into pieces or blocks for sushi. Always use good quality fish from a reputable seller.
Since you are dealing with raw fish, you must learn the instructions well before making your first sushi. Let us dive into the sea of detailed but easy-to-understand instructions for sushi preparation.
What fish can I use for sushi?
You can use several types of fish for making sushi. The most common sushi fish types include salmon, tuna, yellowtail, halibut or flounder, seabass, porgies. Lesser-known types are mackerel, kampachi, sardine.
Other types of fish more rarely used for sushi are swordfish, blue marlin, to name a few.
Mackerel and salmon may have more parasites or bacteria, but freezing and treating fish kills most of them. Fish intended for sushi sometimes may be treated with vinegar to protect from parasites.
Tuna has the least parasites but can contain more mercury than other types of fish. Mackerel, sea bass, yellowtail, swordfish, blue marlin tuna are all often high in mercury, so do not indulge in sushi too much. Salmon is usually farmed, so it has less o that.
Farmed fish from the USA, Canada, or European Union countries or Australia is better because it contains fewer parasites. These countries have solid rules controlling fish farming and food safety.
I would not recommend you use eel, as eel sometimes contains many serious parasites. Only well-trained and experienced sushi cooks should use this fish to make sushi.
We are selecting fish for sushi.
FDA or USDA do not regulate such terms as “sushi-grade fish.” Therefore, you should follow a few rules when choosing fish for sushi.
First, you must choose the proper type of fish. Read the following section about that.
Then rule number one is that it should be as fresh and as recently caught as possible. The freshest fish makes the best sushi. Do not buy old fish.
The second rule is fish must be of good quality. Preparing sushi is a serious endeavor, and good quality expensive fish is necessary for making good sushi.
Third and important, fish must be previously frozen. Prolonged or deep-freezing fish kills parasites. You can read FDA rules for freezing fish in the link I listed at the end of this article. I am talking about the required temperature ranging from -4°F (-20°C) to -31°F (-35°C).
Most home freezers will not work. Only commercial or medical freezers can achieve such low temperatures. But you can freeze fish in the home freezer and keep it there for 5-7 days to compensate for the lack of deep-freezing capabilities of the home freezer.
For making sushi preferably, use fish that was unfrozen only recently within the last 24 hours. Preferably one that was commercially deep-frozen.
Finally, the fish you buy to make sushi better be flash-frozen by a fishing company within 6-8 hours of being caught. So, look for a description or label where it says something like “flash-frozen.” This is the fish that you want to use the most.
If not, in this article, I will describe how to freeze fish yourself. Read on.
The fish you select must be firm when touched, with clear eyes. Its scales should not fall off easily. The fish should not have too much of a fishy smell and no ammonia (rotten) smell. It is preferably frozen or laid on a sheet of ice.
Tip: you can go to a good grocery store or good fish market, fishmonger, and specifically ask for sushi-grade fish. Usually, it is good quality fish that is more expensive. I suggest buying an already cut fillet not to have to mess with cutting and skinning fish.
You will still need to freeze your fish in a freezer until you are going to use it. Take it out and thaw right before skinning and sectioning up as a fillet. Or you can fillet it and then freeze the fillet.
Overall, I recommend buying fish and fillet it right when you are about to make sushi.
A note: FDA says that farmed fish that has been fed anti-parasite feed when raised can be eaten raw without freezing. But it is hard to know what was fed to the fish by the farming company in the grocery store.
Do you wash fish before making sushi?
You can, but typically no, you do not need to wash any fish that has been bled out correctly. This method is done when a fish is taken directly from the sea and is clubbed on its hindbrain.
This allows a fish to remain alive to be bled naturally by cutting the gill arteries and removing the tail.
Essentially, all the blood is pumped out, so the fish meat does not retain any fishy smell or have an overbearing fishy taste.
How to cure fish for sushi
You can buy prepared fish for sushi, such as smoked salmon. But here, I will describe how you can cure and prepare fish for sushi yourself.
Note: The common conception is that when we think of sushi, we think of raw cured fish. Let me note right away that sushi can be made not only with raw fish. Tasty sushi or sashimi can be made with grilled fish fillets, making it safer for newbie sushi makers.
It is essential to mention that some fish require selective curing before the preparation of sushi is completed. Some types of fish will require complete curing to help fish meat to develop complex and appealing flavors.
Note that you should cure fish after you cut it into filler (unless you purchased fillet) before you cut it into sushi slices. See the separate section below about how to cut and slice the sushi.
Let us just say that you have picked up a fresh fish that has not undergone a proper bleed-out. This is called ‘ikejime’ and is often done with living fish only.
But there will be times when you need to cure your fish further so it does not develop those fishy flavors that most people do not like tasting. And curing removes liquid from fish.
One relatively simple method is used to draw out these unwanted flavors before you prepare your sushi.
It is not uncommon that every fish has undergone this process unless you buy fish from a fishing boat or were unprocessed. Follow these steps to get the best results.
This is especially important for fresh salmon curing, no matter where it was caught! You’ll need to buy your salmon from a reputable fish seller, so you have fish that is no more than 2-3 days old.
Easy way to prepare (cure) fish for sushi
We will discuss several somewhat inter lapping ways of curing the fish for sushi. Here is the easiest way.
- Take fish fillets or already cut fish pieces.
- Pour in clean water into a glass or ceramic bowl (or other types of the bowl).
- Add a lot of “kosher” salt and stir until salt dissolves and water becomes clear again.
- Add a bunch of white sugar to the water and do the same.
- Now you have a curing brine solution.
- Put fish into this brine, stir a little, and leave it in the brine for 5-15 minutes.
Essentially, you just cured fish for sushi, but I suggest adding additional steps now.
- Take that fish out of the brine and dry it with paper towels.
- Coat all fish with a salt layer on both sides. Make sure to cover fish evenly everywhere on the fish. This will draw moisture out of the fish.
- Put it on a clean tray for 15-30 minutes. You can put it in the fridge for this time.
- Take the fish and wash off the salt.
You effectively drained most of the extra liquid from fish.
I suggest using a clean tray. Cover the bottom with salt. Put fish fillet on top and press fish a little. Then cover the top side of the fish with a layer of salt. Close the tray and put it in the fridge for 30-120 minutes.
The Morimoto method
Famous Japanese sushi chef Morimoto uses different methods. To speed things up, he buys quality fish and says that the curing process can be done as follows:
- Place fish fillet in a tray, spray fish fillet with salt all over the fish, on both sides, and leave it like that for 30 minutes.
- Then wash off the salt, dry the fish fillet, and immerse it in vinegar for 15 minutes.
On the other hand, I think beginner sushi makers could stick to longer curing timeframes purely for safety reasons.
As you progress in your sushi making, you may want to use more elaborate ways to prepare and cure fish for sushi. Here is one below.
Step one
Take some saran plastic wrap and lay it on a countertop. Then add sea salt onto the plastic wrap followed by paper towels to cover the salt. Ensure that you do not put salt outside the area where your paper towel is folding over onto your fish.
Each overlapping section should have complete contact with the cling wrap as much as possible when it comes time for wrapping.
Step two
- You placed a good layer of salt on that plastic wrapped.
- You have spread a clean paper towel over the salt.
- Now take the fish fillet you have rinsed with very cold water and completely dry it with a paper towel.
- Place fish onto the paper towel and salt. Spray more salt over the fish and cover all fish parts – for a more substantial effect.
- Wrap fish in the salty paper towel.
- Now tightly wrap your salted fish and paper towel in the plastic and allow it to sit for a couple of hours in your fridge.
- The moisture of the fish soaks through the paper towel and activates the salt.
- The salt will draw extra moisture and a fishy smell out of the fish.
Step three
After this, you open the plastic wrap, re-rinse your fish again and pat it dry with a dry paper towel. This fish meat is then ready to be sliced and served after that.
This is just another method for curing since many types of fish need curing to help develop the Umami flavor. Keep in mind that this method usually works for fish that were not bled out properly.
Video instruction for this elaborate fish curing method:
Step four
Suppose you want additional safety and favor treatment, like treatment of mackerel or salmon against the parasite. In that case, you may want to do two more steps.
- Take a tray and place dry fish fillet(s) in it.
- Pour enough rice vinegar or other vinegar to cover the fish fillet.
- You can add some ice to the tray.
- Put the tray in the fridge for a day or overnight. Up to 24 hours is fine.
This way, fish gets flavor treatment. Some people also add alcohol like sake or whiskey, or white wine to the tray, but alcohol is not my thing.
Alternative curing method to prepare your fish
Find a shallow tray used that can fit into your fridge. The best tray to use is suitable for baking brownies and should only be 1-2 inches deep.
Now lay your fish onto the tray and begin making your cure mixture.
This is simple to make since you only need 3 parts sugar to one part sea salt, which is a 3:1 ratio. This mixture is sprinkled on both sides of the fish while it is laid in the tray.
Again, I suggest you cover the bottom of the tray with the mixture. Then put a fish fillet on top of this layer of the mixture. And now completely cover the top and sides of the fish with another layer of the mix.
This can sit in the fridge for 1 to 3 hours. But you can keep it in the refrigerator for 2-3 days like that. No more than that, though. If you need to keep it for longer, you would be better off freezing fillet than thawing and curing it.
Here is a helpful video on how to cure fish for sushi:
Step 5 Freezing fish which was not previously frozen.
Sometimes you will buy fish where the label states “never frozen.” If you want to make sure no parasites remain in the fish, you can dry and freeze it now.
If you purchased commercially frozen fish, then you can skip this freezing step.
Commercial or medical deep freezers can do this in no less than 24 hours. Still, a traditional home freezer may hold the fish up to 7 days of freezing before you eat it in sushi.
But generally, if you made the steps above, it will be enough to freeze the fish for about 48-72 hours before you use it in sushi.
Freezing your fish for sushi
Wrap your fish in plastic wrap without catching any kind of air inside the cling film. Wrap it twice over so you get a good seal.
Now you place this into your freezer for 48 hours to 7 days.
Suppose you have a quality freezer with more advanced freezing capabilities (less than -20 Celsius). In that case, you can go for no more than 2 days without much problem. Be sure to place your wrapped fish at the very bottom of the freezer, where there is less moisture.
Here is a deal. If the fish was never frozen commercially, you might need to freeze it for about 3-7 days before making sushi to kill off any bacteria and parasites. That is why I recommended looking for flash-frozen fish so that you would not have to wait for so long.
Another good tip for freezing fish is to wrap your fish in plastic wrap followed by aluminum foil. This prevents freezer burn and is better than directly putting foil on your fish, which can leave an odd taste.
If you have a vacuum sealer, this is the best method for freezing since the air is effectively removed from these sealed plastic bags. This will reduce the moisture if you’ve dry-padded your fish before placing it into each bag.
Great quality freezers that freeze fish more quickly meat will reduce the slow build-up of ice crystals in the flesh itself. Add this to the reduced amount of air within a plastic vacuum-sealed bag, and you have got the best freezing solution.
After recommended freezing time has passed, move the fish to your fridge, where it can thaw out slowly.
How to prepare frozen fish for sushi
This is a big question for most sushi lovers that always wonder how eating fresh fish can be preserved by pre-aging it first.
The method for pre-aging fresh fish helps by storing your fish for more extended periods with freezing up to 7 days before using it.
Reminder: You should first freeze and thaw fish. THEN you can cure and slice it for sushi. This is the better order of preparing fish for sushi.
Thawing frozen fish for sushi
Standard sushi assortments will all contain different sushi and sashimi, so you will need to know which fish to take out from your deep freeze.
If you were clever, you would have added printed labels (simple sticky labels used for envelopes) to mention the date when it was frozen and what kind of fish it is.
These are removed at least one day before your sushi meal, intended for lunch or dinner.
Note: Once thawed, you should preferably use the fish within the next 24 hours. Potentially harmful bacteria may start growing in the fish flesh if you keep it unfrozen longer than that, even if you keep it in the refrigerator.
It is better to put all your frozen fish pieces into a shallow pan so you can keep track of them. When you need one of them, you can quickly go to the fridge and take out only what you need while making sushi rolls or sashimi pieces.
The only exception will be with high-grade tuna, which is almost always flash-frozen when caught. Nonetheless, fresh tuna still needs to be frozen until you plan to use it for sushi much later since it tends to spoil more quickly than others.
How to defrost frozen fish for sushi
Pro sushi thawing tips
The preferred defrosting method should be a slow overnight process since you want to preserve as much of the meat texture. This process can also help preserve the color of fish meat depending on how it was initially sealed.
Once the fish meat is thawed within the fridge, you can then cure it further with a dry cure or another method mentioned above. This only needs as little as 20% salt or, as mentioned before, using a 3:1 mixture of sugar and salt.
This helps thawed fish meat slow down the enzymes that will cause fish meat tissue to break down. It also allows the meat to become springy once again, making it perfect for preparing sushi.
Defrost fish slowly.
The real trick to defrosting fish meat when making sushi is not rushing the defrosting process. Many people make a significant mistake by taking the flesh out of the freezer and letting it defrost on the counter.
This will speed up the meat faster and make your meat mushier as a result. It needs a nice slow thaw that can take overnight, but most sushi experts advise that longer thaws are better.
But if you need to defrost it in a rush, place fish in a plastic bag, close it tightly, and throw it in cold water. Fish should defrost for the most part within 1-2 hours.
If you are in an extreme rush and just about to make sushi, then you can thaw fish in a microwave as a last resort. Nothing scary, but the fish meat structure will be mushier after microwaving.
We still recommend that you give this meat a salted dry cure before it is used to make your sushi. Either way, you will always have better results when following these helpful bits of advice.
After this, you can rinse the salmon with ice-cold water and pat dry with paper towels. The fillet is then sectioned into ‘Saku’ blocks wrapped in plastic wrap and refrigerated.
This allows you to use each block section for sushi portions as you need. Do not forget that you’ll need to use this fish before it starts to go bad. Even though it has been cured, it can still go bad within 5 days.
Do not unfreeze long in advance. Each subsequent freezing and thawing destroy fish meat, and each thawing may allow harmful bacteria to grow. I highly recommend freeze and thaw fish no more than one time at home.
Cutting the fish for sushi
If you decided to do the whole process from A to Z, you would need to cut the fish. In the US, people often associate sushi with salmon. Let us use salmon as an example.
You can see the detailed process of cutting salmon here.
Here is how to cut fish for sushi
Cutting fish is the most challenging part of making sushi. It is not easy, especially the first few times.
Here is the order of cutting fish to prepare for sushi and then slicing it specifically for sushi.
1. First, cut fish in half for fillet.
- If you have the whole fish, then first cut off the head. You should carefully cut the head behind the fish gills with a good sharp knife.
- Then you cut off the fish’s tail fin and tail portion because it does not work for sushi.
- Then cut off the top and side fins.
- Then you put the fish back to you and cut half-deep the fish from head to tail side along the spine.
- Then you turn the fish’s stomach side to you and half cut through the stomach from head to the tail side.
- Now you can finish the job and from the backside, cut to separate both sides of the fish finally.
You have two fish half-sides now.
2. Cut off the main belly because the belly is not the best part of the fish for sushi.
Take all the intestines out. After taking the intestines out of the fish, you may want to wash the fish’s stomach to clean it better.
3. Peel out the bones that you see in the flesh. Remove bloodline, if any.
4. It is time to cut of the skin.
Here is one skinning technique:
- Place the half-side of fish skin down on the kitchen surface in front of you. Again, fish spine side to yourself will work better.
- You pre-cut the fish in one or more places from the top of the meat down to the skin, but do not cut the skin on the bottom just yet.
- Now put the knife all the way down through the cut up to the skin.
- When the knife touches the skin, turn it to one side and gradually slice the skin off, cutting with the knife as close to the skin as possible.
- Press fish from the top with your one hand (if you are a righty), and cut the skin with the knife right below where you are pressing with your other hand.
The goal is to separate the flesh from the skin in that segment. It is easier to separate the flesh and skin of the larger fish like salmon in segments rather than trying to cut through the whole fish.
Here is another fish skinning technique to skin the whole fish side:
- This time place the fish skin up.
- You make a small cut between flesh and skin on the tail end.
- Grab this piece of skin with your left hand.
- Start cutting left to right (if you are right-handed). While you do, you keep holding the skin with your left hand and pull skin a little bit to the left.
Once the skin is off, inspect the flesh to see if any skin coloring (connective tissue) remains on the fish. Carefully slice off that tissue.
Ensure to cut off all white non-fleshy connectivity tissue between skin and flesh because they are too hard and chewy to eat raw.
Ok, now you have good looking fish fillet, and you can cure it as explained above and then cut it into sushi pieces or blocks.
Cutting fish methods for sushi or sashimi
We will briefly overview this because cutting fish for sushi is an art and deserves a separate article. There are several traditional ways to cut fish for sushi.
Hira-zukuri
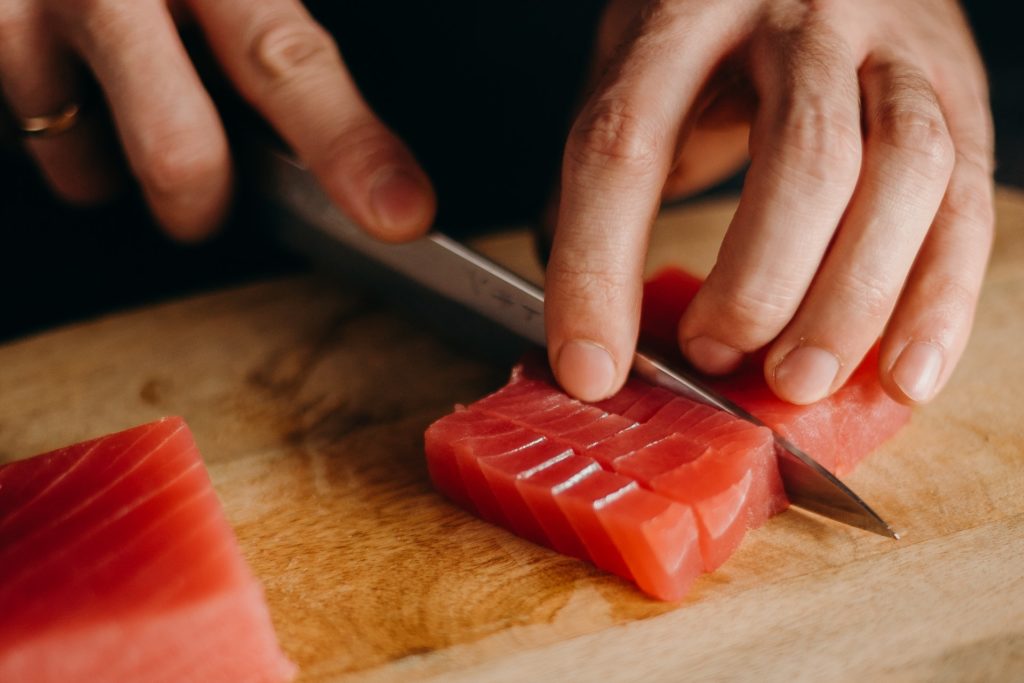
For large fish, you cut the fillet into long strips about 2 inches wide. Then you can cut this strip into smaller sushi slices.
Under any scenario, you can cut fillet or fillet strips into sushi slices, each about 1/3-1/5 inches wide (0.5-1 cm). You should end up with similar blocks of sushi slices. This works well for tuna or salmon.
Usu-zukuri
The next type of cutting is more difficult. It is thin-slicing, where you diagonally cut thin slices off the fish fillet. This works better for soft fish flesh like flounder.
Professionally trained sushi chefs cut their pieces to make them similar, if not identical. This requires lots of practice.
Conclusion:
Now you have prepared fish for sushi and have your slices. Learning how to prepare fish for sushi requires time and practice. It is ok if something does not work out the first time. I recommend focusing on safety for beginners.
Make sure you freeze and cure the fish adequately. Then keep safe when you are cutting it. Making sushi is a recognized skill.
Do not rush. If you beginner, then do things a little bit in slow motion. Cooking can be a mess or an art.
Some sushi chefs train for years before they start working as sushi chefs. Of course, sushi-making involves much more than only curing and cutting it.
How to select fish, keep fish, and check for parasites – sushi chefs learn many different things and techniques.
Enjoy your sushi-making! Not many people know how to do it.